How to Use DaVinci Resolve’s AI Tools


In the ever-evolving landscape of filmmaking and post-production, artificial intelligence (AI) has emerged as a game-changer. Gone are the days when intricate editing tasks required hours of manual labor. Today, AI tools are revolutionizing the way filmmakers approach post-production, making processes more efficient and outcomes more refined.
Enter DaVinci Resolve, a leading name in the motion picture industry. Renowned for its comprehensive suite of editing tools, DaVinci Resolve has integrated AI technology to further enhance its capabilities. These AI-driven features not only simplify complex tasks but also open up a realm of creative possibilities for filmmakers, ensuring that their visions are translated on screen with unparalleled precision.
1. Fusion Magic Mask

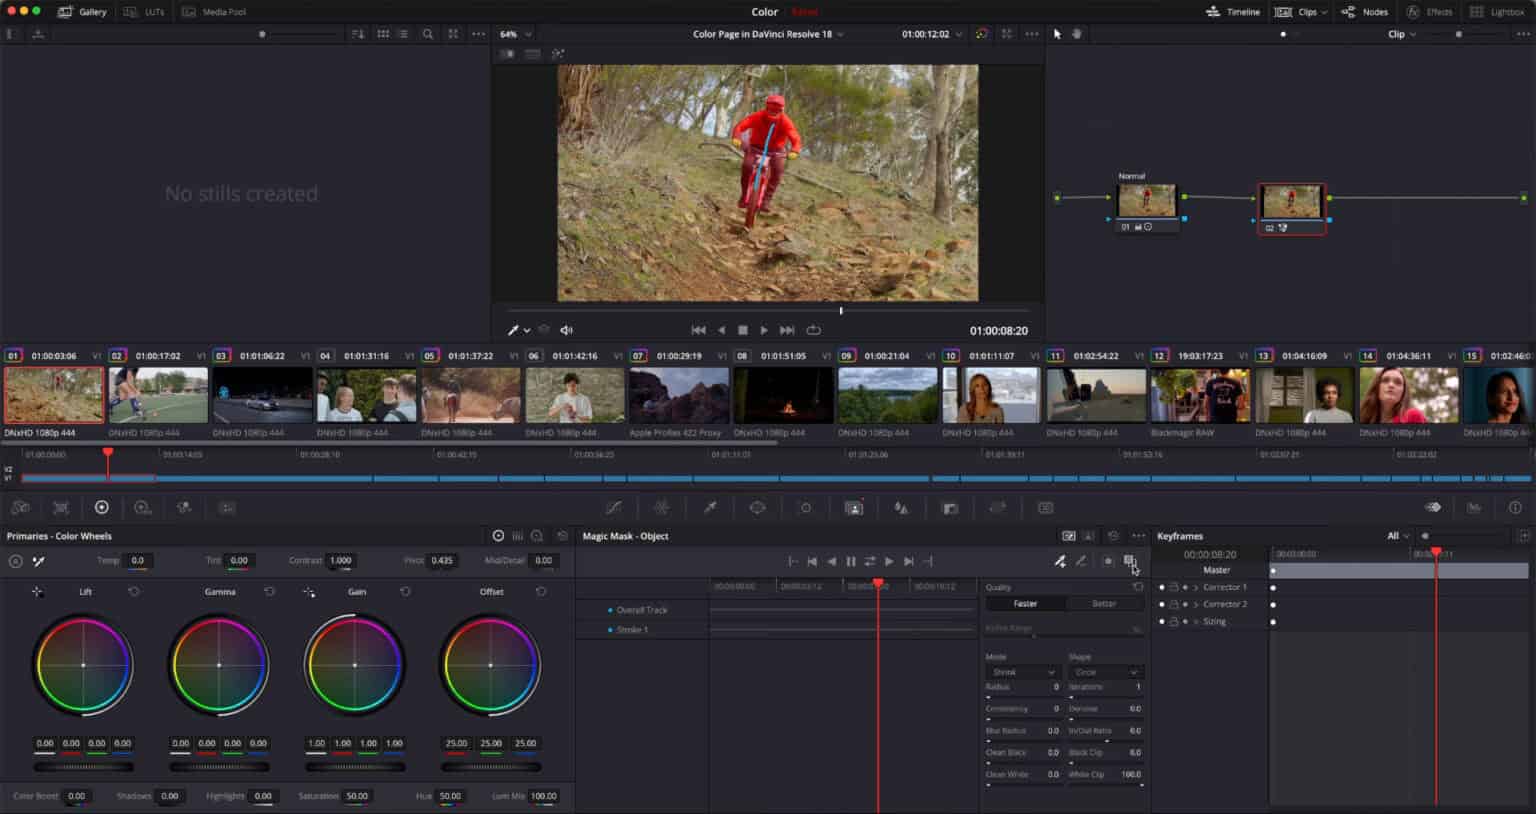
One of the standout AI tools in DaVinci Resolve is the Fusion Magic Mask. This feature harnesses the power of AI to automate the process of rotoscoping and masking, tasks that traditionally demanded a significant amount of time and expertise.
Benefits of Fusion Magic Mask:
Efficiency: Eliminate the need for frame-by-frame adjustments.
Precision: Achieve detailed masks, even for intricate subjects like hair and fur.
Flexibility: Easily isolate subjects or backgrounds for color correction, visual effects, and more.
Step-by-Step Guide to Using Fusion Magic Mask:
Open Fusion Page: Start by navigating to the Fusion page within DaVinci Resolve.
Select Magic Mask: On the toolbar, choose the Magic Mask tool.
Draw a Rough Mask: Using the polyline or B-spline tool, draw a rough mask around the subject you wish to isolate.
Refine with AI: Activate the AI feature, and let DaVinci Resolve refine the mask for you. The software will analyze the footage and automatically adjust the mask to follow the subject throughout the clip.
Adjust Parameters: Utilize the various parameters available, such as “Detail”, “Smooth”, and “In/Out Ratio”, to fine-tune the mask to your liking.
Tips for Achieving the Best Results with Magic Mask:
High-Quality Footage: Ensure your footage is of good quality. Clear, well-lit shots yield better results with AI tools.
Regularly Update DaVinci Resolve: As with all AI technology, updates bring improvements. Ensure you’re using the latest version of DaVinci Resolve to benefit from the most advanced AI capabilities.
Experiment: Don’t hesitate to play around with the settings. The more you familiarize yourself with the tool, the better your results will be.
Harnessing the power of AI, DaVinci Resolve’s Fusion Magic Mask tool offers filmmakers an efficient and precise way to tackle masking tasks. Whether you’re isolating a subject for color correction or creating intricate visual effects, this feature ensures that your creative vision is realized with utmost accuracy.
2. AI Depth Map
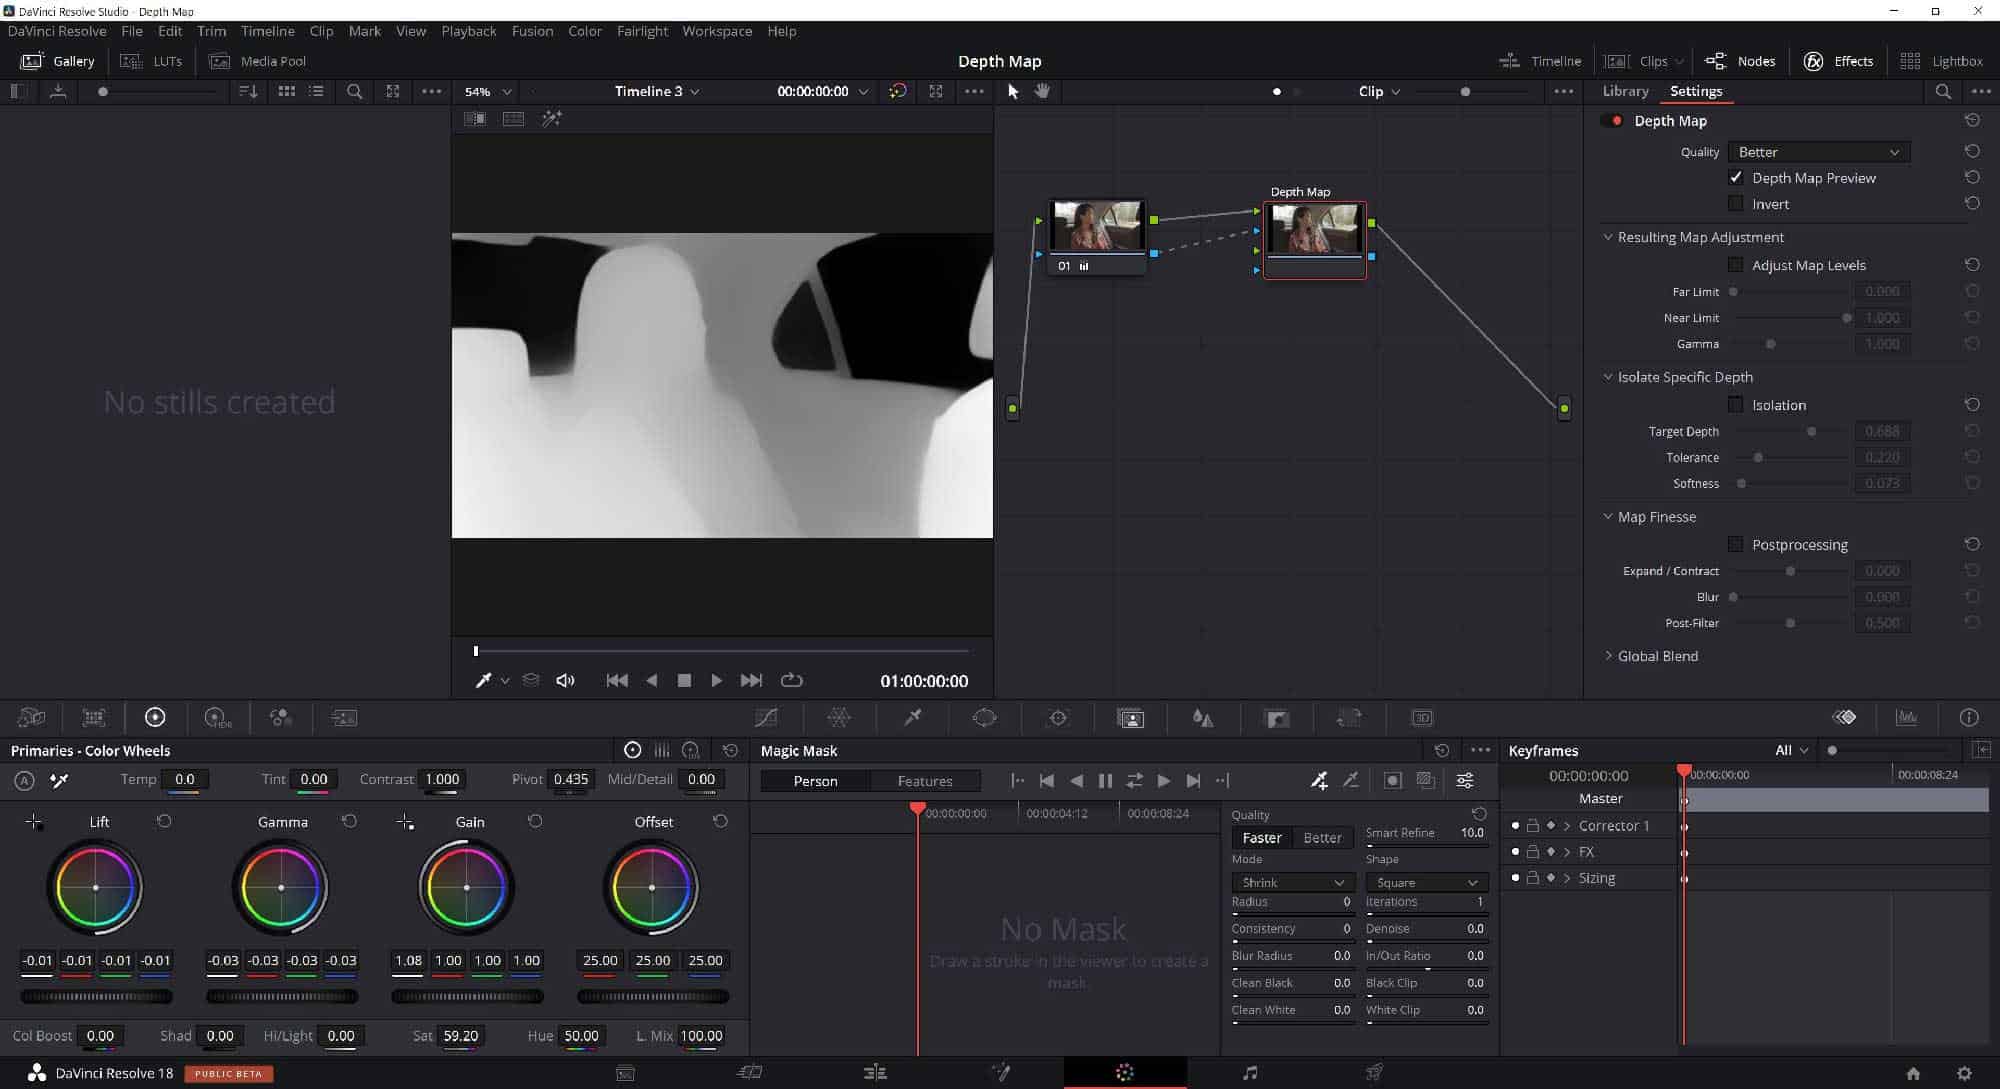
The AI Depth Map is another groundbreaking feature within DaVinci Resolve, offering filmmakers a new dimension of creativity. Traditionally, depth data was primarily sourced from specialized cameras or intricate setups. However, with the AI Depth Map, DaVinci Resolve can generate this data from standard video footage, opening up a plethora of post-production possibilities.
Applications of the AI Depth Map:
Selective Focus: Mimic the shallow depth of field look, focusing on a subject while blurring the background or vice versa.
3D Compositing: Integrate 3D elements seamlessly into 2D footage, ensuring they sit naturally within the scene based on depth data.
Post-Production Camera Moves: Add virtual camera movements in post, with elements shifting naturally based on their depth.
How to Use the AI Depth Map:
Navigate to the Color Page: Begin by moving to the Color page within DaVinci Resolve.
Select Depth Map: In the OpenFX library, locate and apply the Depth Map effect to your clip.
Analyze the Footage: Allow the AI to analyze your footage and generate a depth map. This may take a moment, depending on the length and complexity of the clip.
Adjust Depth Parameters: Fine-tune the depth data using the available controls, ensuring the depth map aligns with your creative vision.
Practical Examples:
Selective Focus: After generating the depth map, use the data to apply a blur effect selectively, creating a cinematic shallow depth of field look.
3D Integration: When compositing 3D elements into a scene, use the depth map to ensure these elements interact naturally with the 2D footage, casting shadows and reflections based on their perceived depth.
3. AI Voice Isolator
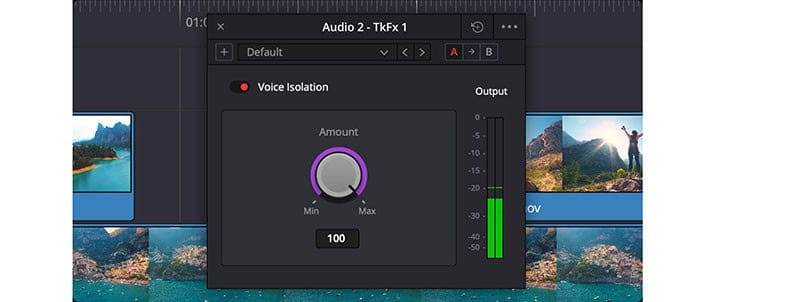
In the realm of audio post-production, the AI Voice Isolator stands out as a game-changer. This tool harnesses the power of artificial intelligence to isolate voices from background noise, ensuring clear and crisp audio quality, a crucial aspect for any motion picture.
Capabilities of the AI Voice Isolator:
Noise Reduction: Effectively reduce background noise, ensuring voices are clear and audible.
Voice Enhancement: Enhance the quality of the isolated voice, making it sound richer and more professional.
Benefits of Using the AI Voice Isolator:
Clear Dialogue: In scenes with significant background noise, ensure that dialogues remain clear and comprehensible.
Professional Audio Quality: Elevate the overall audio quality of your project, ensuring it meets industry standards.
Guide to Using the AI Voice Isolator:
Access the Fairlight Page: Start by navigating to the Fairlight audio page within DaVinci Resolve.
Apply Voice Isolator: From the effects library, select and apply the Voice Isolator effect to your audio clip.
Adjust Parameters: Use the provided controls to adjust the level of noise reduction and voice enhancement. Listen to the audio in real-time to ensure optimal results.
With tools like the AI Depth Map and Voice Isolator, DaVinci Resolve continues to solidify its position as a leading software in the film and TV industry. By leveraging the power of artificial intelligence, filmmakers can achieve professional results more efficiently, ensuring their projects stand out in the competitive world of Hollywood.
4. AI Object Mask Tracking
In the dynamic world of video editing, tracking objects within a frame is a task that often demands precision and patience. DaVinci Resolve’s AI Object Mask Tracking feature is a game-changer in this domain.
Object Mask Tracking, powered by artificial intelligence, allows filmmakers to automatically track objects within a scene. This is particularly useful when you want to apply effects or color corrections to specific moving elements within your footage. The AI-driven tool ensures that the tracking is accurate, even if the object is partially obscured or undergoes changes in perspective.
How to Use Object Mask Tracking for Various Purposes:
Initiate the Tracking Process: Within DaVinci Resolve, head to the Color page. Use the Power Window to draw a rough mask around the object you wish to track.
Engage the AI: Once the mask is drawn, simply click on the ‘Object’ button in the tracker palette. The AI will then refine your mask to fit the object precisely.
Track the Object: After refining the mask, hit the ‘track forward’ or ‘track backward’ button. The AI will ensure the mask sticks to the object throughout the clip.
Apply Effects or Corrections: With the object accurately tracked, you can now apply color corrections, effects, or any other adjustments specifically to that object.
Tips and Pointers for Achieving the Best Results with AI Object Mask Tracking:
Ensure your initial mask is as close to the object’s shape as possible. While the AI is powerful, a closer initial mask can enhance accuracy.
For objects that undergo significant transformations or occlusions, consider breaking your clip into smaller sections and tracking each one separately.
Always review the tracked footage to ensure no frames were missed or inaccurately tracked. Manual adjustments can be made if necessary.
Embracing the Future of Filmmaking with AI
The integration of artificial intelligence in tools like DaVinci Resolve signifies a monumental shift in the filmmaking and post-production landscape. These AI features not only streamline tedious tasks but also open doors to creative possibilities that were previously unimaginable.
As AI technology in motion picture editing continues to evolve, it’s clear that the future of filmmaking lies in the harmonious blend of human creativity and machine precision. For filmmakers and editors, now is the time to dive deep into these tools, harnessing their power to craft stories that resonate, captivate, and inspire. Whether you’re a seasoned professional or just starting out, DaVinci Resolve’s AI tools are set to elevate your craft to cinematic heights.